Braise, Cook

Coq au Vin

Beginnings

Pioneered in France, popularized in mid-20th century America by the legend Julia Child, and now destined for your dinner table and guests, Coq au Vin is a timeless French classic that I’m honored to share with you today. My take on it seeks to marry traditional ingredients with a few modern twists to make preparation palatable to the modern chef. Follow along, give it a shot, and you’ll be sure to impress your guests at the next gathering you host.

Coq au Vin ingredients

The Ultimate Coq au Vin

This saucy classic is sure to impress, and can turn even the toughest old farm rooster into a fork tender treat.
Prep Time 1 d
Cook Time 5 hrs
Course Main Course, Soup
Cuisine French
Servings 4

Equipment

  • Large pot (preferably cast iron) with lid
  • Large bowl
  • Tongs
  • Wooden spatula

Ingredients
  

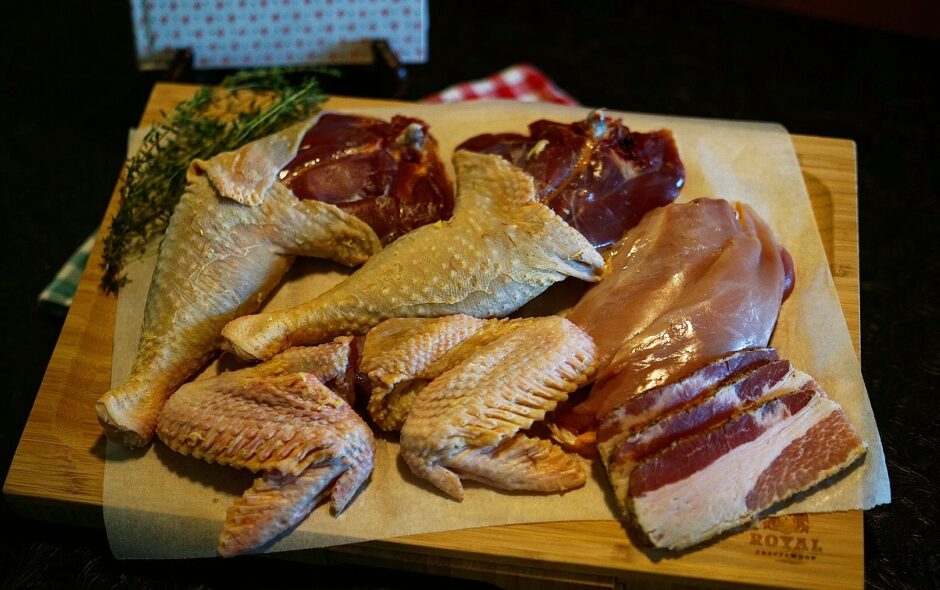
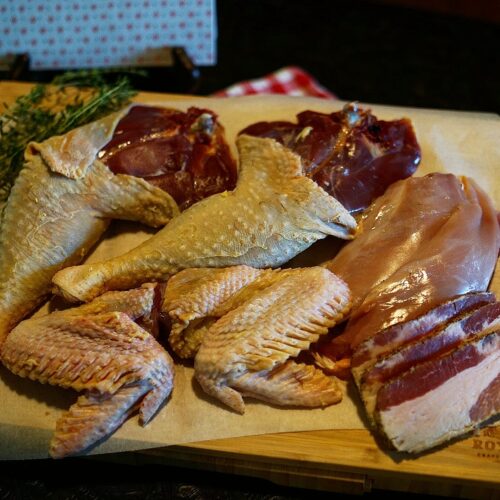
  • 1 tough old rooster (or any chicken) butchered into thighs, drums, wings and breasts
  • 4 oz lardons (raw weight)
  • 3 cups cabernet sauvignon wine not super fancy, but not hobo wine either
  • 1 onion large, diced
  • 1 carrot chopped
  • 8 ounces baby portabello mushrooms chopped
  • 1 tbsp pre-minced garlic hate all you want but it's amazingly convenient
  • 1 tbsp tomato paste
  • 8 oz pearl onions OR shallots peeled
  • 2 tsp kosher salt
  • 1 tbsp thyme leaves freshly harvested and chopped, no thick stems
  • 1 tsp black pepper fresh ground
  • 1 bay leaf from the nearest bay

Instructions
 

Butcher and marinade (day before you plan to serve)

  • Find that one rooster at your farm that has really been pissing you off. Liberate its head from its neck, then pluck the bird. Break the old roo down to boneless breasts, thighs, drums, and wings.
  • Put the pieces in a large bowl, then add wine, thyme, and the bay leaf. Cover and marinate overnight.

Preparation (day of serving)

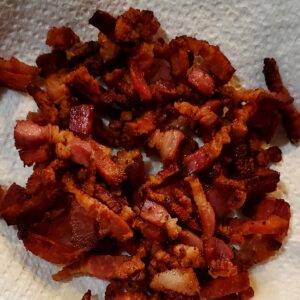
  • Using a large pot with a lid (cast iron preferred, but any will do), cook the lardons until they are crispy, and all the fat has been rendered. Transfer them to a paper towel covered plate with tongs, and them them cool. Do not remove the rendered bacon fat from the pot.
    Bacon lardons
  • Remove chicken from the marinade, drying it thoroughly with paper towels, or even better – a couple old (but clean!) terry cloth rags. Heat the bacon fat until you see the first wisps of smoke, then brown each side of each piece of chicken in the fat. It may take a few rounds depending on the size of your pot, which is perfectly fine.
    If in this process you start to run low on bacon fat in the pot, feel free to add some more you may have stored on your countertop (if you live in The South) or any other flavorful fat/oil you might have laying around. If not more bacon fat, I'd recommend either beef tallow or olive oil. Using your tongs, remove each finished piece of chicken, and place it on a plate.
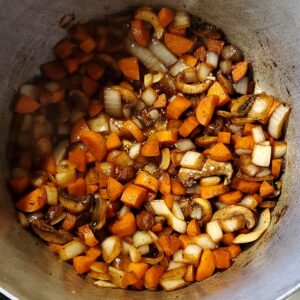
  • Add chopped onion, carrot and half of the mushrooms to the pot, and let them have a turn browning in the bacon fat. The heat should be medium – enough to brown the veg, but not so much that everything is smoking and setting off your smoke detectors. It should take 5-10 minutes to get the veg where you want, and be sure to use a wooden spoon to scrape all of the brown and black charred bits free from the bottom of the pot while you're doing this. These dark bits are the foundation of how incredibly savory and robust your broth will be by the time this dish is completed.
    Carrots, onions, mushrooms
  • Add garlic, tomato paste, all of the marinade, chicken, and half of the cooked lardons into the pot, and – in the words of a certain maiden from Arendelle – LET IT GOOOO, LET IT GOOOO….but really, just let it go.
    The idea here is that we want to retain our moisture level such that the chicken is mostly covered by liquid and can braise for as long as it needed to become fork tender. If you bought your chicken from the grocery, or say you used a meat bird you raised on your farm and slaughtered at nine weeks, this won't take too long – perhaps an hour or two. However, if you're using old Foghorn Leghorn, get comfy. An old rooster's act of defiance against you will be refusing to get tender until the universe ages, and you might need to braise for 3-4 hours. Your mileage may vary, and don't let a food blog paint you into a corner where you feel you need to end up serving Tractor Tire au Vin instead of Coq au Vin. Just let it go until when you test tenderness in the pot with a knife or fork, you're pleased with what you observe.
  • While the chicken is braising, get a medium sized skillet, add butter, melt, and sauté pearl onions (or shallots), along with the other half of the mushrooms low and slow, for a good 10-15 minutes. The goal here is we want some of the veg to retain a nice chew and body to it. If we put everything in at the same time, all of the veg would be too soft and lacking in mouthfeel. What does in first contributes most to flavor, and what goes in last contributes most to appearance and chew.
  • (optional) If you desire a thicker broth than what you have in the pot, feel fee to braise without the lid on the pot until your volume of liquid decreases, or simply add some corn starch that's been pre-mixed with water in a small measuring cup. If you do this, please remember that the thickening effect of corn starch takes a little time to manifest, so be patient.
  • When you're ready to serve, dump the remaining ingredients in your skillet into the pot, along with the second half of the lardons you set aside earlier. Using a ladle, start a bowl off with a good scoop of the broth and goodies, and then place a piece of two of the chicken along with it. Garnish with parsley or more thyme if you wish, and enjoy!

Afterword

  • Remember, cooking is art more often than it is science. Don't get too lost in the details that you don't enjoy yourself. Most importantly, don't be afraid to improvise! These instructions are guidelines, not hard rules that will result in ruin and sorrow if not perfectly followed.
    Take notes! If you decide you want the next batch to be easier on the bacon (perish the thought), more on the salt, less on the thyme, etc. – write this down! Taking an iterative approach to your dishes and building upon your notes will help you perfect the dish, and make it become YOUR recipe, and not one you simply followed off of the internet – which should be the goal!
    Enjoy!
Keyword Braise, Chicken, Coq au Vin, Rooster
Breakfast, Charcuterie, Cook, Hog, Smoke

Homemade Cherry Smoked Bacon

Today is the day! Follow these simple steps to forever change your perspective on what this all-American staple is capable of being.

I want to take a moment to thank my original charcuterie mentor Seth Davis over at Crooked Oak Brewing Co. (IG: crookedoakbrewingco) for the friendship, tutelage and support in my quest to get on his level at the charcuterie game.

Homemade Bacon
Homemade Bacon

Homemade Cherry Smoked Bacon

Homemade bacon changes your life forever. Once you discover how easy it is to take ownership of the skills and means by which to produce your own bacon, you'll never look at store bacon the same again. To compare the two would be akin to comparing a Pinto to a Ferrari.
Follow these simple steps to another huge milestone in your culinary liberation.
Prep Time 7 d
Cook Time 10 hrs
Course Breakfast
Cuisine American
Servings 20 people

Equipment

  • Stainless steel pellet smoking tube
  • Smokehouse, smoker or other smoke chamber
  • Food scale that measures in grams
  • Meat hooks for hanging the bellied while smoking

Ingredients
  

  • 2 % Salt kosher
  • 1.5 % Sugar granulated
  • 0.25 % Curing Salt

Instructions
 

  • Remove pork belly from packaging, and using your food scale, measure its weight in grams. Ensure you tare the scale if you're placing the belly on a plate on the scale (which you likely will be, to keep the scale clean).
  • Set the belly aside, place a small bowl on the scale, and tare the scale. Then calculate 2% of the weight of the belly, and weigh out that much salt. Move the salt to a second small bowl.
  • With a now empty bowl on the scale, tare the scale again, and add sugar to 1.5% of the weight of the belly, and again, move it to the second bowl.
  • Now, with an empty bowl on the scale again, tare it once more, and add 0.25% curing salt. Please take special care not to botch the math (I've almost done this many times by missing a zero when doing the percentage).
  • Mix the weighed ingredients together.
  • Place the belly in a large ziploc bag, and add half of the weighed out mixture to each side of the belly, rubbing it in well on both sides.
  • (optional) record the weight of the belly and all of the ingredients on the bag for future notes and fine tuning of the cure to your liking.
    Homemade Bacon
  • Remove most of the air from the bag, and place in your fridge for seven days, flipping every day during that week.
  • After seven days, remove the belly, and pat it dry, and use meat hooks to hang the belly in your smoke chamber of choice.
  • (optional) lightly coat the bellies with pepper. I prefer 16 mesh for bacon.
    Homemade Bacon
  • Fill the smoke tube with cherry pellets (or any other pellets you feel like using, but cherry is the best in my opinion), and light one end so it starts smoldering like a huge cigar.
  • Cold smoke for ten hours, ensuring that the temp inside your smoke chamber does not exceed 90 degrees Fahrenheit. If it gets over 90F, remove the bacon, put it up in the fridge, and start again once your ambient temps drop enough (this might have to be at night if you live in a hot climate or its summer). I often fill the water tray in my smoker with ice to help bring the temp down if I'm running too hot.
    After at least ten hours of smoke, you're good to remove the bacon, slice, package and enjoy. Don't be afraid to experiment with longer smoke times or different pellets to make it your own!
    Homemade Bacon
Keyword Bacon, Cold Smoked, Cold Smoked Bacon, EQ Bacon, Equilibrium Cured Bacon, Homemade Bacon, Smoked Bacon
Charcuterie, Hog

Cured Wild Hog Ham

I couldn’t have imagined when I started this process, that a wild hog (even for me, a consummate fan of all things related to eating wild game) could have become such phenomenally flavorful and savory ham. It all started with the kill, naturally, and his was no ordinary wild hog. As good as your average hog is, this one was the stuff of dreams: a huge sow, fattened on a diet of a local farmer’s sorghum crop, and putting on weight before bearing a litter of bacon seeds. I spotted the sounder to which she belonged enter the field from a distant CRP pasture, and began a 500 yard stalk with the AR. Mind you, at this point I’d been on a dry streak with the hogs, and I decided to give the bow a break and bring down the thunder since I had a mad hankering for wild pork! I kept the wind in my face, and when she looked my direction to try to finally determine what I was, I was 20 yards away and had the drop on her – goodnight Ms. Piggie!

Wild Hog
Sorghum fed 180 pound sow.

I took her home, where she weighed out at 180 pounds, and got to work from there. However, upon butchering her, I discovered just how noticeable the difference was between this pig and the countless others I had killed. Her fat levels were through the roof, and even her strip loin was laced with fat veins!

Strip Loin
Beautifully marbled strip loin!

Truly, if there were such a thing as wagyu pork, this pig would have qualified as such. Needless to say, I was excited! My buddy David had told me about how delicious his first pass at making ham out of wild hogs had gone, so I decided to borrow my brine formula I use for corned beef, and get to it. For the brine recipe, scroll down to the bottom of this post!

After 10 days of soaking in the brine, all that remained was around 10 hours of mesquite smoke, beginning at 160 degrees, and building up to 260 degrees for the final stretch. The idea here is to warm the center of the ham while the outside is absorbing smoke, but not so rapidly that you end up completely drying out the exterior of the ham and making a bark that’s too chewy and bitter.

Wild Hog Ham
Just after removing from the smoke.
Cured wild hog ham
Perfectly spiced and sliced.
Bon Appetit!
The money shot.
Wild hog ham
Into the skillet to pair with yard eggs!

Bon Appetit!

Wild Hog Ham

Perfectly cured, savory wild hog ham. Prepare to never want to grind your wild hog meat again!
Prep Time 10 d
Cook Time 10 hrs
Course Main Course
Cuisine Wild Game
Servings 20 people

Equipment

  • Pellet Smoker or Smokehouse
  • Stock Pot
  • Plastic Turkey Oven Bags

Ingredients
  

  • 1 deboned, cleaned wild hog hind leg
  • 1 gallon water
  • 2/3 cup kosher salt
  • 1/2 cup dark brown sugar packed
  • 1/4 cup pickling spices
  • 4 tsp pink curing salt
  • 1 tbsp minced garlic
  • 1 pack powdered gelatin

Instructions
 

  • Carefully and cleanly remove the femur from the hindquarter. Then, looking at the now-deboned meat layed out on your cutting board, remove any arteries, glands, connective tissues, and excess fat (a little remaining is ok). Basically, you want to see almost exclusively lean meat by the time you're done.
  • Heat water after adding salt, curing salt, sugar, pickling spices and simmer until all salt and sugar is dissolved. Allow to cool to room temperature.
  • Place meat in a large plastic turkey oven bag, and then add all of the brine solution to the bag also. Remove air from the bag, twist the top, and then clip the twist with a potato chip clip. Place the bag in some sort of plastic tub to protect against any possible leaks during curing process, and keep refrigerated for ten days.
  • After ten days, remove meat from brine and spray off meat thoroughly. Pat dry on a cutting board, and sprinkle one bag of powdered gelatin to what will be the interior of the ham (where you removed the femur). This will promote adhesion and act like a glue that will help keep the various muscle groups sticking together into a nice finished product.
  • Tie up with butchers twine and smoke in a smoke house or with a pellet smoker for 10 hours over mesquite. Starting temperature should be around 160F, with temps increasing by about 15 degrees per hour up to 260 degrees, then kept there until internal temperature reads 155F.
  • Remove ham from smoker, immediately immerse ham in ice bath for 20 minutes to stop the cooking process, pat dry, and either rest for 24 hours or start slicing!
Keyword Charcuterie, Cured, Ham, Wild Hog
Smoke

Big Announcement!

“There is naught but precious little time given to us in this life, and to tarry foolishly can lead to everlasting regret.” –Someone, probably

I’m elated to announce that for reasons that are sure to be the subject of much scientific research, my best friend and soulmate Leah has agreed to be participatory in – and victim of – my shenanigans, indefinitely!

One Ring To Rule Them All

We celebrated our joyous occasion in standard “us” fashion; by eating like we expected a meteor strike to wipe out the planet imminently! I made us a surf and turf consisting of marinated, smoked elk tenderloin, coupled with steamed golden king crab legs, because as all red-blooded Americans know: when cooking a huge portion of red meat, seafood counts as a vegetable!

New paring knife thanks to Black Hog Knives!
Serving elk tenderloin is always a “thank God I’m alive” moment.
Ahh, a perfectly balanced meal.

Oh…now might be a good time to let you all know that a certain someone is going to be aiming to put an arrow in a huge black bear in only a few weeks, so stay tuned!

Lift

Squat Time!

Here’s a brief recap of my last two squat sessions. I feel some PR’s coming!

Cook, Holiday

Valentine’s Day Done Right

Elk, Lobster and Scallop Surf & Turf

While this day can be a source of mixed emotions for many, one thing rings true – if you want to do something special for someone, a gift from the heart is always best. To this end, I’d like to share what I made my girlfriend this past Thursday.

  • Colossal Scallops, broiled and dusted in coarse sea salt, cracked garlic pepper blend, and ground thyme
  • Elk London Broil steaks, seared on CI in olive oil, salt, pepper and garlic
  • 12oz Lobster tail, steamed and topped with housemade clarified butter
  • Beta sweet carrots and asparagus, broiled and seasoned like the scallops
  • Dessert was housemade chocolate dipped strawberries and raspberries, with a delicious and mildly citrusy North African chocolate called Akoma

I will post the individual recipes for these goodies in their respective categories in the weeks to come, but wanted to share this today for your enjoyment!


Chocolate dipped raspberries
The reason I don’t have a six pack
Breakfast, Cook

Venison Eggs Benedict

The king of breakfasts.

Ahh, eggs benedict. The king of breakfasts. What’s not to love? Hollandaise joyfully baptizing english muffins, delectable meats and a perfectly poached egg in it’s buttery, exquisitely savory embrace.

Assert your culinary dominance by following these easy – if not brief – steps, and your brunches will be the talk of the town! All humor aside, this is one of my favorite breakfasts, and even though it takes more work than you’ll likely be willing to put in on a super frequent basis, it makes for one hell of a nice treat.

The inclusion of the venison came to me by happenstance, as I had cooked it the night before, and decided last minute that I wanted beautiful, thin slices to really harmonize with the dish. With the meats, feel free to experiment! If you have some leftover pulled pork, use it! Thinly sliced ribeye steak or venison? Great! There’s few options here that will really steer you astray. Remember, cooking is art. I’m just offering one of many ways to skin the cat here.

Without further adieu, let’s get to it!

EggsBenedict

Venison Eggs Benedict

Prep Time 15 mins
Cook Time 45 mins
Total Time 1 hr
Course Breakfast
Cuisine American
Servings 2 people

Ingredients
  

Poached Eggs

  • 4 Eggs
  • 2 tbsp White Vinegar
  • Water 2/3 full saucepan

Hollandaise Sauce

  • 1 tbsp Water
  • 1/4 tbsp Salt
  • 1/4 tbsp Smoked Paprika
  • 1/4 tbsp Smoked Chile Powder
  • 1/4 tbsp Sugar
  • 3 Egg Yolks
  • 8 ounces Unsalted Butter

Meats (use any you desire, these are just my preferences)

  • 1 package Bacon
  • 1 package Canadian Bacon (spoiler alert: it’s ham)
  • 3 ounces Thinly sliced roast venison backstrap

English Muffins

  • 4 English Muffins 🙂 sliced and toasted

Instructions
 

Meats

  • Bake bacon on a foil lined cookie sheet at 350 degrees while you’re doing the rest of the steps. Brown Canadian Bacon in a small skillet while you’re working on your hollandaise and once done, use tongs to set slices aside on a plate. Have your roast venison backstrap thinly sliced and on another plate.

Hollandaise Sauce

  • Whisk egg yolks, water, salt, chile powder and paprika together until completely blended.
  • Juice a few limes until you have three to four tablespoons. Ensure it’s free of any seeds or pulp, and set aside.
  • Cut two full sticks of cold, unsalted butter (to be clear, that’s two 4oz sticks) into 1/4″ thick slices, on a plate. The warming of the butter in the pan will serve as a temperature regulator to the overall sauce as it’s coming together.
  • Add mixture to a warm (you should still barely be able to touch the center) cast iron skillet. Turn heat up to medium-low (on a 1-8 scale burner I mean no more than a 3). The key thing here is you do NOT want to rapidly raise the heat. Doing so will result in the egg yolk forming curds faster than you can blend them. 
  • Do. Not. Stop. Whisking. Keep your whisk moving and constantly breaking up any curds you may start to see form. Imaging moving the whisk as if it were a paint brush, and you were trying to paint the whole surface of the skillet.
  • Add 3-4 of your butter slices at a time, and whisk as they melt into the sauce. Repeat. Once half of your butter is added to the skillet, add half of your lime juice, keep whisking, and continue with your butter. Once the last of the butter is added, add the last of the lime juice and the sugar. Thoroughly whisk. Did I mention to whisk?
  • Remove from heat and set pan on a trivet or cold burner, where it will remain warm until dish is assembled.

Poached Eggs

  • Fill a saucepan 3/4 of the way up with water. Add vinegar, and bring to a near boil. You should see small bubbles rapidly forming at the bottom of the pan, but should not have a rolling boil. This is crucial because excessive agitation of the water will result in your egg whites being ripped apart from each other, before they’re able to coalesce into a unified object, vis-a-vis your poached egg.
  • Swirl the water in the pan with a wooden spoon until it is rotating at a moderate pace. Crack your egg and *gently* allow the egg to fall directly into the center of the vortex of water you have going. You want your hands to be as close to the water as possible without burning yourself. Alternatively, you may crack the egg into an appropriately sized ladle and gently tip the egg from the ladle into the water. The point here is the egg must not *plunge* into the water, but must be *set* into the water, as you would place a sleeping baby upon a bed. To drop the egg into the water violently, or to place it anywhere but the center of the vortex of water will result in the egg white being ripped apart, and your water becoming totally opaque, which will in turn require you to heat new water, since you’ll be unable to poach future eggs and see what’s going on in the pan. This is an art, and takes a little practice. Do not be discouraged if you mess up an egg as you learn! After all, you can’t make an omelette (or eggs benedict) without breaking some eggs. 🙂
  • As your egg poaches, discourage it from sticking to the bottom of the pan by ever so gently coaxing it with your wooden spoon if it appears too affixed to the bottom of the pan. Once it rises to the top of the water and has been floating for about a minute, it’s ready. Gently remove it from the water with your wooden spoon, and set it on a plate. Repeat as necessary.

Constructing Your Eggy Tower of Glory (bottom to top)

  • English muffin half
    Teaspoon of Hollandaise
    Your choice of meats
    Poached egg
    Two tablespoons of Hollandaise
    Sprinkle of smoked paprika, as garnish
  • Enjoy! You have successfully constructed the king of breakfasts!
Keyword Benedict, Benny, Breakfast, Eggs
Lift

A Way Of Life

Notice a color theme? Hehe. It’s not a chore..it’s a way of life!